Emails are an important everyday communication tool we encounter more often than not in this digital age. We spend a considerable amount of time writing, reading, sending, and replying to emails.
One of the most widely used email services is Gmail by Google. In this article, I will show you how to save time, organize, and sort your emails to increase productivity by the use of Gmail Filters.
What exactly are Filters?
Filters are essentially a way of
Filters can be considered as doors, where the condition set; filter criteria act as a key to the door. Once an email meets certain criteria, it opens the door that leads to the execution of the set instructions or automation as defined in the filter criteria.
The fascinating thing about filters used in Gmail is that they come in handy and are very easy to set up as you will see.
Filter using Gmail Search Bar.
One of the easiest and most commonly used filter options is the use of the Gmail search bar. The process of searching for an email in your mailbox by use of the Gmail Search bar is the most basic filter we use.

Example: Filter for mails from Marie Poulin
Let’s take the example that you want to check for Marie Poulin newsletter emails, by simply inputting the names on the search bar, you will see all the emails sent or received from her.

This makes it easier to locate the specific email you want. Even if it was sent a year ago, you can search and get it. Isn’t that amazing? Maybe you want to get some tips that were shared a while ago. In a brink of a second, you will have everything that you need.

In this, we are applying automation to the emails if they met the specific criteria. We have automatically filtered for all mails from Marie Poulin
The filter selection allows you to filter a specific email address, subject lines, certain words, emails of a certain size, specific timeframe, and attachments. Just try out all the options to filter for exactly the emails that you want.
The Advanced Search Options
The Gmail search bar comes with advanced search options which give you more criteria that you can use to search and filter through your email.

To access the Advanced Search Options from the Gmail search bar, click on the button at the right-hand end of the search bar. A drop-down menu will appear with additional criteria you can use to enhance your search. Let us go through what each of the options on the dropdown menu means:

From: This option is used to filter out an email sent from a specific email address.
To: It is used to filter out an email you sent out to a specific email address
Subject: It is used to filter out an email that has the specific subject indicated.
Has the words: It is used to filter out an email with the specific keywords indicated
Doesn’t’ Have: The option is used to filter out emails that don't contain specific words
Size: It is used to filter out emails that are within the size criteria specified
Date Within: It is used to filter out emails within the specific timeframe
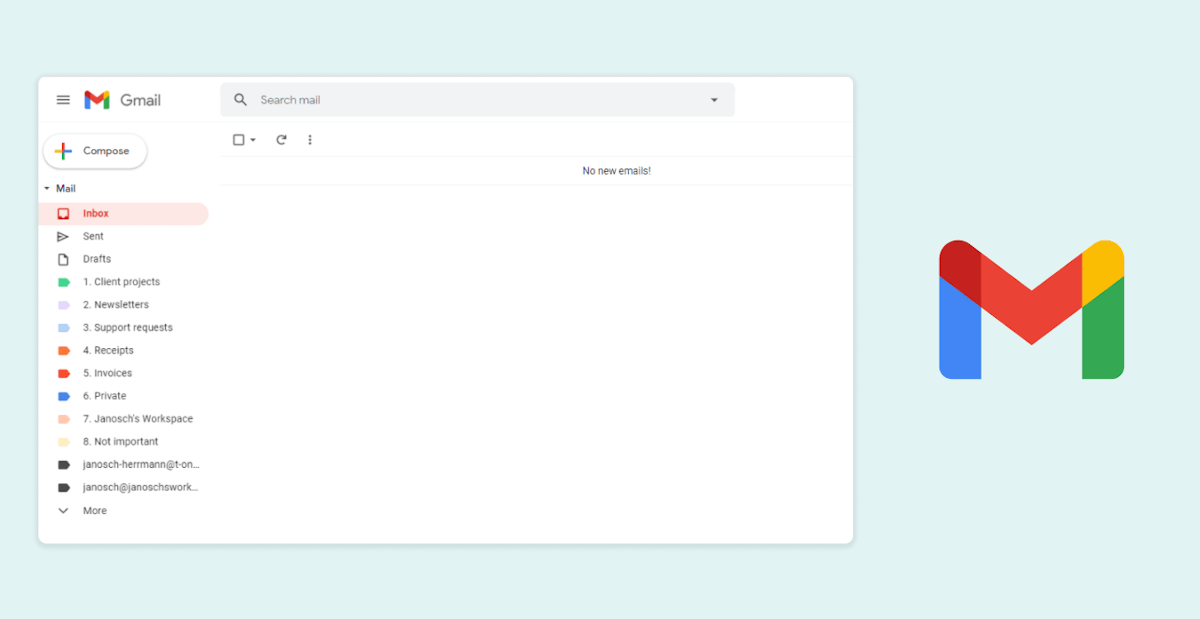
Search: It is used to specify the folders in the Mailbox you want to search/filter through.
The dropdown search menu also offers the option to filter out emails with attachments, or with chats - if needed, by clicking on the checkbox.
As simple as that, you can use the various options to make your mailbox functions easier. Your use of Gmail will become much easier than you have ever imagined!
Filter options and How to Create Them
Now that you've filtered for the right mails, it's time to tell Gmail what to do when receiving a new mail matching our conditions. To do that, click on the create filter option at the bottom.
A dropdown option will appear with several filter criteria; let us go through each of them to understand their use and application.

Skip the Inbox: Enabling this option will make any mail matching the conditions skip the inbox. Really useful for mails that are annoying & not important to you. Also great, if you want to categorize your mail before reading it.
Mark as Read: This option will mark the email as read. Great for mails that aren't important, as it reduces the stress of having thousands of unopened emails.
Star It: This option will star the message and the email will appear in the Starred Message Folder. Great for important emails that you want to keep as "Starred".
Apply The Label: This option is very useful when it comes to organizing and categorizing your emails. This menu option allows you to create labels of your choice and once an email meets the criteria set for the label, the email will be sent to the specific folder.
For example, you can have a newsletter label for all the newsletter emails you receive.
Forward It: this option will automatically forward the email to the forwarding email addresses defined within this option.
Delete It – This option will automatically delete the email set in the criteria once received. While using this option, be careful not to apply to important email. (Personally, I think it's not great to use this option. Archive mails that you think are not important instead of deleting them directly)
Never send to spam – There are times when emails that are not spam are occasionally sent to the spam folder. You can use this option for emails you are sure are not spam.
Send Template: This option allows you to automatically reply to the email using a pre-set email template/message.
Always / never mark as important: This option allows you to automatically mark, or never mark, the emails as important.
Categorize as: This option allows you to categorize an email in the pre-set categories e.g. primary, social, etc.
Also, apply filter to other matching conversations: This option allows you to apply the filter rules set out to other emails that match the criteria.
After selecting the filter options that suit your needs, click create filter, and congratulations, you have set up your first Gmail filter! Your emails will now appear as per the filter criteria you set out.
Creating Filters directly on an Email.
There's also another way to set up filters that's great if you want to create a filter as you read an email.

On an email, you are reading:
Step 1: Click on the email.
Step 2: Click on the more option, (three dots on the far right of the email)
Step 3: Once done with that, click on the “Filter messages like this” option.
Upon doing this, Gmail will filter through your mailbox and bring up emails similar to the one selected. The same drop-down menu similar to that of the Advanced Search bar option will appear. You can now refine your filters to find what you are looking for and apply as shown above.
Best use cases for filters:
Filters can come in handy in organizing, automating, and enhancing overall productivity by saving time while using your Gmail.
Some of the best use cases include:
#1: Organizing Emails and Pre-applying Labels.
You can use the filter options to automatically move emails to specific categories, folders, and labels based on your preference. This means you know exactly where to look for specific emails, saving time while remaining organized.
You can also organize emails based on tags, which can allow you to have a separate space in your Gmail account. Hence, no more distraction while doing your normal work. Now, you can just check for specific emails during your preferred time. Even if you want once a week, it's all up to you!
Not only can you do that for emails, but also specific documents like invoices or receipts. You can keep track of all your transactions in one place. Again, an absolute time saver!
#2: Filtering Out Spam or Unnecessary Emails.
Filters also come in handy in sorting out spam, as well as emails that you feel are not important and most probably will not read anyway. By applying filters, you can automatically send such emails straight to the “Not Important” folder.
You can now say goodbye to the automated messages from your social media that you feel should not appear in your inbox.
#3: Send Automated Replies.
One very useful advanced use case for filters is to send out automated replies using the pre-set email templates for incoming mail that meets the set criteria.
You can think of the many scenarios where this option can come in handy, and apply it accordingly. For example, sending automated emails while on vacation.
However, ensure your filter criteria are set up correctly, to avoid sending out the wrong templates to the wrong recipient.
Still not sure about setting up filters?
I've recently launched my new coaching service, "Janosch's Tech Support". With just 1-2 coaching calls, I can help you set up your tech tools, understand key concepts & help create processes that work for you.