Client onboarding can be a time-consuming process that many client-based businesses have to deal with on a regular basis. If done right, it can be a good start to a long & healthy relationship with your new client, but when not done properly, it can make your team unproductive and can ruin your first impression with your customer.
In this guide, I'm going to show you how you can set up a great onboarding process that is simple to follow, highly customizable & completely automated. We'll be using some of the most commonly used tools for managing modern digital companies like Todoist, Google Workspace, Slack & many more. Let's get started right away!
This guide is part of my Zapier 101 course that covers all the various ways you can use Zapier to automate processes in your business. If you want to learn how to save time using simple automations, get the course for just $19.99!
How the process works
In order to build any good process automation, you first need to think about what you actually want to achieve with your automation. In the case of an onboarding process, we mainly want to complete lots of organizational tasks, like:
Getting basic information from your client. This includes their billing address, contact person, name of the client, company name, etc.
Preparing the client for the collaboration. How does your company work? What can the client expect from you? How will you communicate? How will you share files, etc.? These are all questions that can be answered during onboarding. Creating a short video that goes through all of these things can save you hours of time which each client.
Depending on the business, you can also ask the client for additional information, like what they want to achieve, what they want from the collaboration, their competition, etc.
Once you've got all this information, the last step is to organize yourself internally. This can include things like determining which of your colleagues or employees will work on this project, who's responsible for it and simple things like creating a Google Drive folder for the client, setting up a client Slack channel, etc.
Make sure that you know what you want to include in your onboarding process, before moving forward with this guide.
Set up your onboarding form
Now let's get started with setting up the onboarding process. The first thing we have to do is to create an onboarding form. This form will be the trigger for our onboarding process. It's where our client will be entering their information and where we can ask questions based on our individual onboarding process. Later, we'll use that information in our automation workflows, so be sure not to skip this step.
To create this form, I'm using Typeform which is an easy-to-use and powerful form building platform. It's great for our onboarding automation, because it allows you to ask your client all types of questions easily and it's very well integrated with automation tools like Zapier.

Keep in mind though that the exact tools you use don't really matter. There are lots of other tools that you could use, but I just like Typeform the most. If you don't know which tool to use, my recommendation would be to try out Typeform, as that's what I'll be using throughout this guide 👍
Now inside of Typeform, we'll create a new form for our onboarding process. Here you can add all the questions you'd like to ask your new clients. Here's a really simple version of what this could look like. Obviously, you can add everything that makes sense to you here. Just keep in mind that this will be one of the first touchpoints that your client has with your company, so try to make it easy & somewhat quick to fill out.
Once you've finished setting up the form, go through a test run so that you actually have a real example of the data that your client will enter in the form. This will help us with the Zapier automation.
Creating the Zapier trigger
Now that you've got a example form entry ready, we can get started with the actual automation. To do that, head over to Zapier and create a new Zap.
Again, if you're not yet familiar with Zapier feel free to watch my Zapier introduction video. If you want to learn more about all the possibilities that Zapier gives you, take a look at my Zapier 101 course ✅
Ok, so let's set up the trigger for our automation now:
Step 1: Create a new zap, then search for Typeform and choose the Typeform app as your trigger.

Step 2: For the trigger event, choose the "New Entry" trigger event.

Step 3: Next, choose the Typeform account that you want to connect with this automation. If you've never connected your Typeform to Zapier, you will first have to authenticate the account.

Step 4: Choose the form that you created inside of Typeform. This let's Zapier know which form to trigger the automation for.

Step 5: Now it's time to test if the automation triggers correctly. To do that, just click on the "Test trigger" button.

If Zapier is able to get data from the trigger successfully, it means we're now ready to automate tasks in your onboarding process!
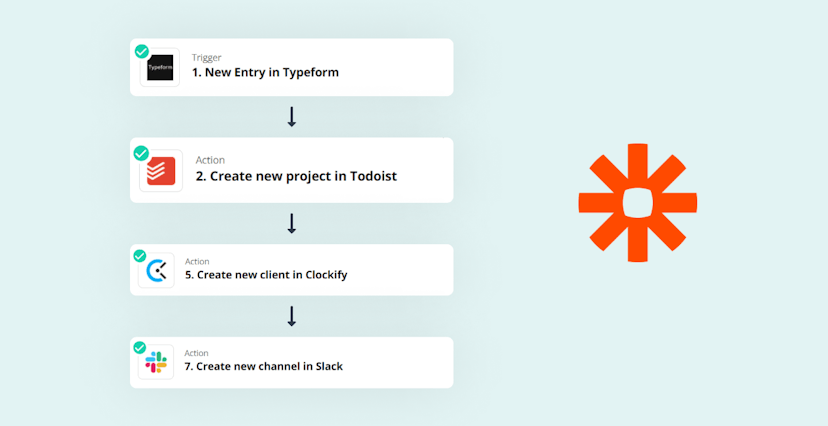
Create a project in Todoist
The first thing we'll automate is creating a project in our team task management application. In my case that's Todoist. First, we'll create a project in Todoist and then in the next step we'll add in employees and external collaborators.
Step 1: Go back to your Zapier automation and add a new step to the automation. Choose Todoist as the app.

Step 2: Next, choose "Create Project" as the event.
Step 3: Again connect you're Todoist account if you haven't connected it yet.
Step 4: Now we'll have to set up the first actual automation step. We have to define set up the name of the project we want to create. Obviously, this should not be the same everytime. Instead, we want this to be set based on information our client entered into our onboarding form.

To achieve this, click on the "Name" field and look for the field "Company name" in the dropdown list. This will of course only work if you've set up a field for the company name in your Typeform automation before.

Step 5: Just as before, you'll have to test your action to see if it works. This time, we can actually check if it worked by going to our Todoist account and checking if the project has been successfully created. In my case, it worked!

Add users to the Todoist project
Right now, you're the only person that has access to the newly created project, but if you're working with a team, you'll likely want to add your team members to the project as well. Let's set this up inside of Zapier as well.
Step 1: Create an additional action step and choose Todoist again.
Step 2: Then choose the action, “Invite a user to project in Todoist”.
Step 3: Choose the account.
Step 4: In order for Zapier to know which project the users should be added to, you need to specify it in the "Project" field. To do that, go to the "Custom" tab and then choose the ID that was generated in the previous step.

Step 5: Enter the email addresess of the people you want to invite into the field. This adds the user to the project in Todoist. Just make sure, that you're using the same email addresses that your team members are registered with in Todoist.
Step 6: Test if it works.
Create the project in Clockify
Next up, we'll set up a project in Clockify as well. Clockify is an easy-to-use time-tracking solution that you can use to log hours for your clients in a simple way. In this step, we'll create set up the client so that your team can just logging hours immediately.
Step 1: Add a new automation step and choose Clockify as the app.
Step 2: As the event, choose the "Create client" option.
Step 3: Choose your Clockify account.
Step 4: Create the client in Clockify. For the "Workspace" you can just use your default workspace. For the client name, we'll again get the data from the Typeform response. You'll need to add a field for the client name in your onboarding form for this to work if you haven't done that already.

Step 5: That’s it! Now you can check the Clockify app to see if the client has been added.

Now, repeat this step following the same steps to create a project for that client as well. To tell Zapier which client you want to add the project for, use the project ID like we did it for the Todoist step.
Create Slack channel
As we also want to communicate with our client, let's create a joint Slack channel with them.
Step 1: Add a new automation step and choose Slack as the app. (You see how this process is pretty similar).
Step 2: As the event, choose the "Create a channel" option.
Step 3: Choose your Slack account and enter the channel name. You can use the business name question from your onboarding form.
Step 4: Don't forget to test 🧪
Add users to the Slack channel
In order to add users to your Slack channel, we'll have to create an additional automation step.
Step 1: Add a new automation step and choose Slack as the app.
Step 2: Choose your Slack account, the previous ID, and the Slack channel that you used. Then add the users (you can add multiple).
Step 3: Check to see whether it works.
Create a Google Drive folder
Next, we'll create a folder structure in Google Drive. This will save you time instead of manually doing it.
Step 1: Add a new automation step and choose Google Drive as the app and choose "Create folder" as the action.
Step 2: Choose your account and set up the action. The folder name should be the “business name”. For the Drive, you can choose your Google Drive.
Step 3: Lastly, use the name of your project as the name of the Drive folder.
Step 4: Check if it works 🧪
To add more subfolders, just repeat this procedure and use the ID of the parent folder in the parent folder field.
Internal planning
We can't automate everything perfectly, so we'll have to do some manual work to complement our automation. Also, we want to have an internal strategy call for every new client to get all employees on board. To rememember this for every client, we'll set up a reminder in Zapier
To do that, add a new automation step using the Todoist app, choose your account, and choose "Create Task" as the action. As the name of this tasks, write down the manual tasks that need to be done in order to complete the onboarding process. This could be scheduling the internal call, requesting login credentials from the client or anything else.
After you're done, assign this task to one of your team members, so there's a clear responsibility for this task. Also don't forget to test!
That's it! We've finished the onboarding process. Again, this guide only shows one of millions of ways to set up a process like this. You can get way more advanced than this, with more complex forms that clients fill out, where they upload documents, watch an onboarding video series, or get added to your client email list. Also, it doesn't matter which tools you use and which things you include. In the end, it just has to make sense for you and your business.
Hope you enjoyed this guide. See you next time :)
If you want to learn about more ways you can use Zapier to automate processes in your business, you can check out my complete Zapier 101 course! For just $14.99, you get a comprehensive overview of Zapier, including tutorials for built-in tools, lots of inspiration for use cases and a lot of practical tasks you can go through to improve your automation skills 😊