In the last 2 years, the demand for digital communication & organization tools has skyrocketed. One of these digital tools that are shaping the workday of tomorrow is called Loom. Loom is a video messaging tool you can use for easy communication with your clients, co-workers, or students. Loom allows you to record, edit and share videos from your browser easily.

The beauty of this approach is that it makes it much easier to communicate meaning & subtle differences by video, compared to long email threads or useless phone calls. Using your voice along with visual illustrations of what you're trying to say, allows you to get better feedback, and the recipient gets a clearer understanding of what you're saying. Loom helps you do this in a super intuitive way, directly in the browser.
In this article, we are going to see how you can set up and use Loom to enhance your productivity. Let's get started!
Create your Loom account
Currently, there are 2 different ways to use Loom.
Through the Loom desktop application
Through the Loom extension for Chrome
If you're not using Chrome, you will need to use the Loom desktop version. In all other cases, using the Chrome extension is completely fine.
To create an account, head over to the Loom website.
Loom pricing
Loom offers a couple of different pricing plans. To start out, the free plan is completely fine. It allows you to create up to 25 videos, each up to 5 minutes long. If you're teacher, you can also get access to the free Education plan that Loom offers!

If you are looking to use Loom long-term, I'd recommend that you also take a look at the Business plan though, as it offers essential features like:
Unlimited videos
Unlimited recording length
Custom branding
Filler word removal
... and other customization options!
Install the Chrome extension
Now that you've got your account ready, the only thing left to do is to install the Loom extension for Chrome. To do this, search in Google “Loom for Chrome”, select the Chrome extension on the search page.

Now, click on “Add to Chrome” to install the plugin. After installation of the Chrome Extension, a Loom Icon will appear on your Chrome browser bar. You can always click on the icon to access Loom on your browser and access the menu options which will allow you to start your recording process.
Loom recording options explained
In this section, we are going to go through the basic options available on the Loom menu. Again, you can access this menu by clicking on the little Loom icon in your Chrome browser bar.
![]()
Let's get started by going through the basics!
Recording mode
Loom gives you the choice to decide what to record, when you're recording. Here are the different options:
The screen only – Records your screen only.
Camera Only – Records only using your camera
Camera and Screen – Records both your screen and from your camera
For Option 1 – Screen only and Option 3 – Camera and Screen Only, you can choose the area of focus for recording on the screen. You can choose to record the full desktop or only the current tab by clicking on either of the two.
Choose your camera & microphone
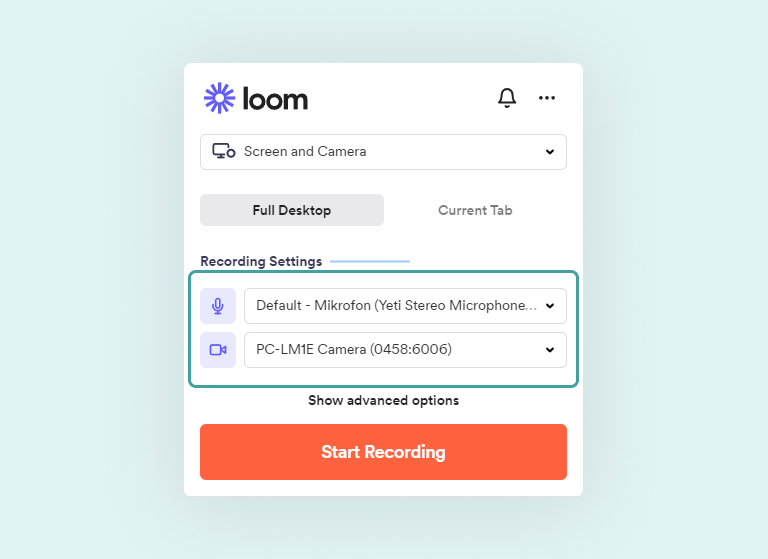
Loom also allows you to choose the microphone and camera you intend to use for your recordings. Normally it chooses the default microphone and Camera inbuilt in your PC, and you can change this to another connected microphone or camera.
To mute your microphone, hover over the microphone icon on the menu and click on it. To Disable the Camera, hover over the camera icon on the menu and click on it.
Advanced Loom recording options

To access the advanced options, click on the “Show advanced options” button at the bottom of the Loom Extension Menu. A drop-down menu will appear with several options.
Flip Camera – This option flips your camera.
Use Photo for Screen Only – This option places an image attached to your Loom profile in the corner of the screen recording.
Control Menu – This option allows you to enable or disable the control menu.
Recording Countdown – This option allows you to have a countdown timer before every recording.
Show recording time – This option allows you to see the recording time. For free plan users, the recording video length is limited to 5 minutes.
Create your first Loom video
Now that you have already set up all the options suitable to the recording you want, it is now time to start recording.
To do this, click on the start record button. A pop-up will appear asking what you want to share. You can use the entire screen option if you want to share your entire screen. You can choose the window option to specify which window you want to focus on.
Finally, you can choose Chrome tab; if you want to share a specific Chrome tab you are working on. Once you start recording, you will notice a blinking red recording light on the Loom Chrome Extension Icon.
Once you are done with your recording, click on the Loom Chrome Extension Icon on the Google Chrome navigation bar to stop the recording. This will then redirect you to the Loom Application where you will find your video, ready for editing, all in the browser.
Edit your Loom video
Now that you've recorded your first video, it's time to go through some of the options you have for editing & customizing it. Let's dive right in!
Review the transcript
For Business and Enterprise users, Loom offers a transcription service that transcribes as the video is being recorded. Currently, the transcription service works only in English. The transcript comes in handy while watching the recorded video, as they appear as closed captions while the video plays.
You can access the transcript by clicking on the Review transcript button on the right side.
![]()
If you want to quickly skip to a certain part of the video, you can search the transcript for specific keywords. For example in the transcript for a video about Loom, you might want to search for "recording options" to find out where the options are being covered.
You also copy the transcription if you want to use it to create a blog post, for example 👍
Change your video preferences
Another option you have is to change the video settings for the video you just recorded.

This includes options such as:
Allowing comments
Enabling/disabling the Loom branding on the video player
Allowing viewers to download the video
Showing video statistics publicly
... and more. Go through them yourself if you want to customize how your video is displayed.
Trim your Loom video
The built-in trimming feature allows you to quickly edit awkward pauses and silly mistakes out of your video. You can access trimming mode by clicking on the Trim video button in the sidebar.

Now, you've entered trimming mode! You can now do the following things:
Trim the start/end of the video
Split the video into clips and cut out parts
Delete entire clips.

If you're not satisfied with your edits, you can always click on the Revert changes button to undo all the changes you've made to your video.
Call-To-Action
Calls-To-Action allow you to prompt video viewers to further engage with your content, by adding a button at the end of your video. You can configure this button to direct users to any other webpage that you like. This is great for promoting your email list, a product or a related resource on your website.
To get started, click on the Call-to-action button in the right-side menu:

Now, a menu with additional options pops up. This is where you can edit the branding of your Call-to-action and where it leads people to:

Enter in the button text, add the button link & add some styles that match your brand. That's it!
Add a thumbnail
Adding a thumbnail to your video can be a really nice touch, especially if you're planning to embed the video in your website or another app.

To create the thumbnail, click on the "Thumbnail" button in the right-side option panel. Then, a new panel pops up that allows you to upload your thumbnail.

It's recommended to use .png or .jpg for your thumbnail. You can use an animated thumbnail from your video.
Share your Loom video
Now that we have reviewed the editing options available in the loom Chrome Extension, it is now time to share/publish your first video.
Click on the “Share” button at the top to access the sharing options available. There are 3 options for sharing your Loom video:

Share: From this option, you can either input names of team members in your loom or the email address of the recipient. One of the easiest ways to share your recorded video is by clicking on the “Copy Link” button. You can also adjust the privacy options to fit your needs.
Social: This option allows you to share your video through Social media such as LinkedIn, Twitter, Facebook, and Google.
Embed: This option allows you to copy Embed code you can use to add the video to your website or your blog.
Another option to share your video is to directly copy the link of the video by clicking on the link icon to the right of the Share button on the top bar. With the copied link, you can share using different platforms, including your Gmail. Once you paste the link into an email it automatically generates a thumbnail for the video.
Embed your Loom in your WordPress website/blog
For content creators who use WordPress and want to publish/embed the recorded video to their blog or website, this is an easy way to go about it.
First copy the video link, then head over to your WordPress website/blog and create a new page. In the add title section, paste the copied link, and the video automatically embeds itself together with the video player.

Once you publish the page, your users and viewers will now be able to access the video on your blog or website.